

If there is anything I have learnt in the innovation world, when the world is seemingly in chaos, it is then a great time to come up with innovative solutions to assist humanity onto a higher consciousness path.
This happens to be that kind of post of thinking.
I believe rocket tech is old tech and the mere fact we need to burn something like fuel to make something fight gravity to get off this planet, is almost symbolic of all the other lower consciousness activities happening - it's simply ridiculous!
Therefore, here is some inspirational thinking and hopefully someone finds this and picks it up to carry on the experimentation.
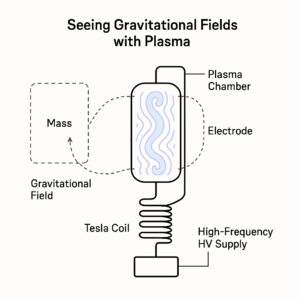
Build a Gravity Field Visualizer Using Plasma
GOAL:
Create a device that lets you observe the influence of gravity (or gravitational anomalies) by watching how plasma responds to distortions in space or energetic interference.
MATERIALS NEEDED
Core Components:
Plasma Chamber
Glass or acrylic tube (vacuum-safe)
Noble gas: Argon, Neon, or Helium
Vacuum pump + pressure gauge (~1–10 Torr)
Electrodes & Power
Two aluminum/copper electrodes (capped on both ends of the tube)
Tesla coil or high-voltage power supply (15–50kV, 10–100kHz)
Support Frame
Non-metallic stand or base
Mounting system to allow vibration isolation
Sensors (optional but powerful)
Accelerometers
Magnetometer
EM field meter
Laser interferometer (advanced)
Camera
High-speed or low-light-sensitive camera
IR/UV filters for deeper spectrum visualization
Heavy Mass
A block of lead, tungsten, or dense stone to simulate gravitational presence
Faraday Cage (Optional)
To isolate from external EM noise
STEP-BY-STEP INSTRUCTIONS
STEP 1: Build the Plasma Tube
Fill the chamber with noble gas (Argon or Neon) to ~5 Torr.
Seal the chamber with electrodes on both ends.
Connect the HV source (Tesla coil or similar) to the electrodes.
Activate it and tune to get a stable, glowing plasma arc.
→ You now have a sensitive medium to respond to field changes.
STEP 2: Stabilize & Observe
Mount the plasma tube on vibration-dampened supports.
Let it stabilize for a few minutes while plasma flow normalizes.
Start recording with your camera (ideally in a darkened room).
STEP 3: Introduce Mass Nearby
Place your heavy mass beside the plasma tube.
Slowly move it closer and observe:
Any bending or shifting in plasma filaments
Change in brightness, movement, or structure
Record the distance and plasma behavior
(If gravity does distort the local space enough, it may subtly affect the plasma, especially under EM excitation.)
STEP 4: Add Frequency Modulation
Introduce pulsed frequencies into the Tesla coil.
Sweep from low (10Hz) to high (100kHz+).
Look for resonant reactions — plasma turbulence, spirals, or standing waves.
→ These can amplify gravitational field effects or reveal hidden field lines through visible plasma behavior.
STEP 5: Introduce Rotating Magnetic Fields (Advanced)
Spin a Halbach array or superconducting disc near the plasma.
This could mimic gravitational lensing or rotating mass effects (like in frame dragging).
Watch for twists, vortex shapes, or filament compression.
STEP 6: Analyze with Sensors
Use the accelerometer and magnetometer to log any field fluctuations.
If you’re tech-savvy, set up a Raspberry Pi or Arduino to plot changes in EM field, and overlay with video of the plasma.
Please keep me posted as to how this all goes!
p.s.
Also make sure you follow any and all safety protocols and if in doubt, find a suitable laboratory with the necessary compliance, personnel and equipment.